How to configure FreeNAS 8 for iSCSI and connect to ESX(i)
FreeNAS is working a bit differently than Openfiler when it comes to configuring iSCSI connection to ESXi host.
When I finished building my homelab recently, I at first tested several distributions but finally sticked with FreeNAS which I think has the coolest user interface, and which can be up and running in less than 10 minutes.
There is an iSCSI configuration which works a bit differently than what I use to experiment with Openfiler. So if you’re new to FreeNAS or Learning ESX(i) and if you have experienced a bit in your homelab and installed a FreeNAS 8 with RaidZ spindle you might
want to read on.
I’ll try to show you how I achieved this iSCSI configuration on my homemade NAS box running Intel Atom 1.6GHZ double core CPU. At first after
creating RAID Z volume, which you could see in my previous article, I went the and created NFS share.
For iSCSI there are different configuration possibilities in FreeNAS 8. If you’re have some individual disks or(and) RaidZ spindle. If you’re having an individual disks like I do, (I have 2 individual SSD’s on 2 SATA ports) you can export the whole disk
as an iSCSI disk, and so you will create a device extent. But you can’t do it for ZFS pool. You have to create a file and then export the file.
On the FreeNAS website, you can see that the file extent is slower than device extent.
A quick quote from FreeNAS documentation:
A device extent allows a raw partition (volume) to be exported via iSCSI. The advantage of device extent is that they are faster than file extents. The disadvantage is that the entire volume is exported. If you only want to share a portion of a volume
using iSCSI, you will need to create a file extent instead.
A file extent allows you to export a portion of a volume. When creating a file extent, you specify a file name that iSCSI clients will have access to (similar in concept to a mount point) and the maximum size of that file (storage area). The advantage
of file extents is that you can create multiple exports per volume. The disadvantage is that they are slower than device extents.
This makes me think, in my case, I better configure my individual SSD’s as an iSCSI targets and the raid Z volume as an NFS …. -:) to get the most out of my SSD’s and use the RaidZ spindle for more/less some storage, since those 4 SATA drives with 7200
RPM won’t deliver much IOPS anyway.
Ok Let’s go and configure one disk as an iSCSI Target. Not so difficult.
The steps:
01. Portal group creation.
Go to the Portals > Add Portal.
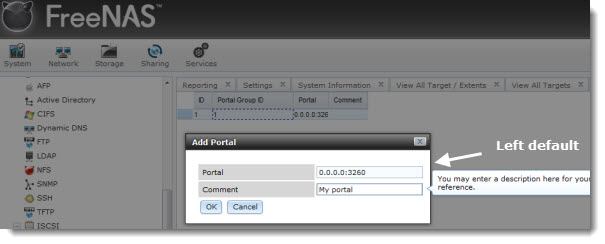
02. iSCSI initiator.
Go to the menu Initiators > Add Initiator.
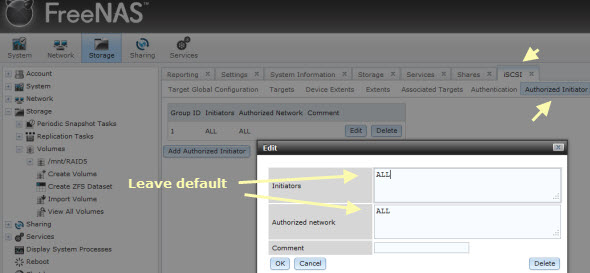
The next step is to create an iSCSI target.
03. Create an iSCSI Target.
Menu Targets > Add Target.
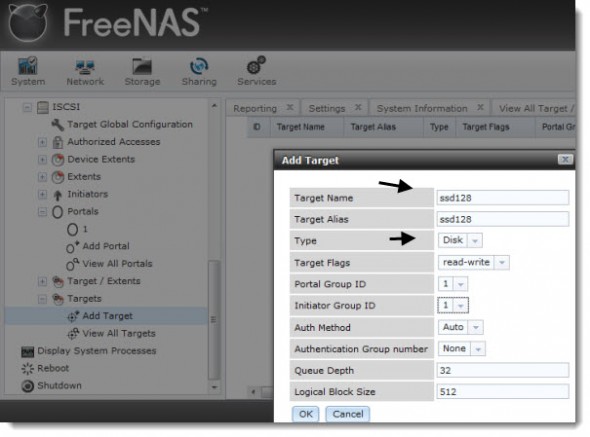
Once the target created, you must create an extent. As I mentioned before, the device extent is apparently faster, so I go for it and create a device extent. The downside is that the whole disk is exported. Does not really matter in my case, since the disks
size is only 128 Gigs.
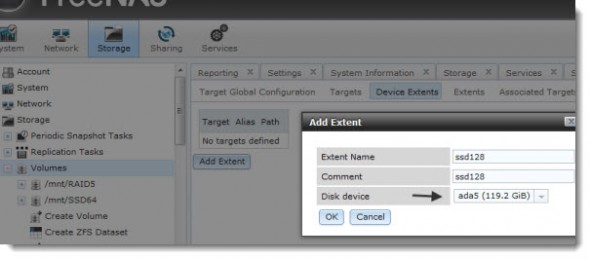
04. Device Extent.
To add a device extent, go to Services > ISCSI > Device Extents > Add Device Extent
In the example below I’m creating a device extent for the whole SSD which has got a 128 Gigs of total storage capacity.
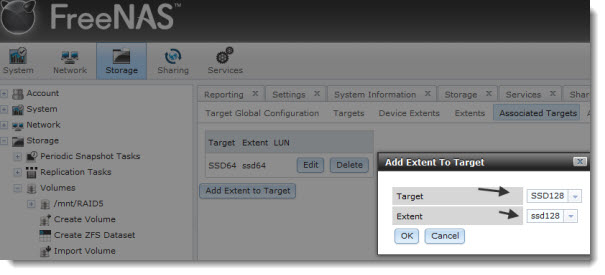
05. Target/Extent Association.
After the Extent created, the next step is the Target-Extent association. Once this done, one last step is to activate the iSCSI service.
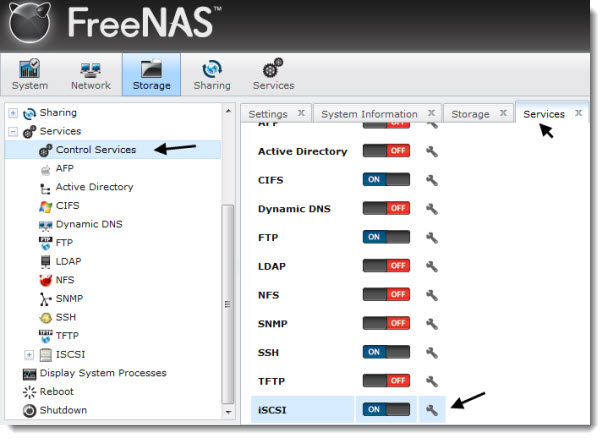
06.Activate the iSCSI service.
The iSCSI service can be activated in this menu.
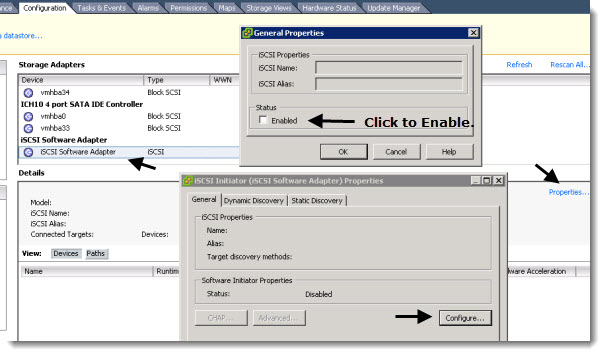
07. Connection from the VMware ESXi Server.
That’s it for the FreeNAS part, concerning that single SSD disk. The next step are on the VMware vSphere console. Connect to your individual ESX(i) server or through vCenter. This part is actually the
same as described in the Openfiler’s configuration.
Go to the Configuration >Storage Adapters and enable the
iSCSI storage Adapter first.
Then Enter the IP adress of your NAS device – it’s 10.10.8.10 in my case – as on the image below…
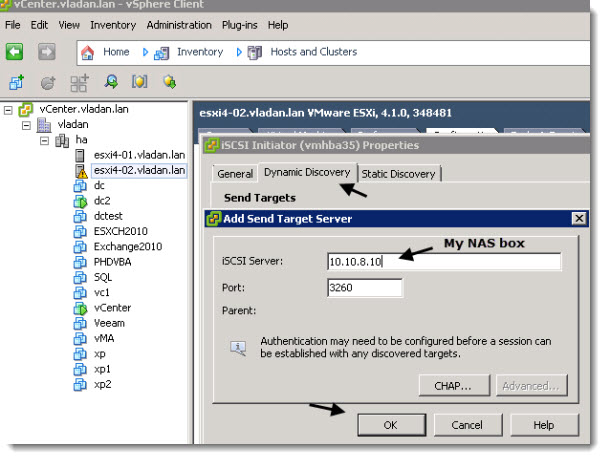
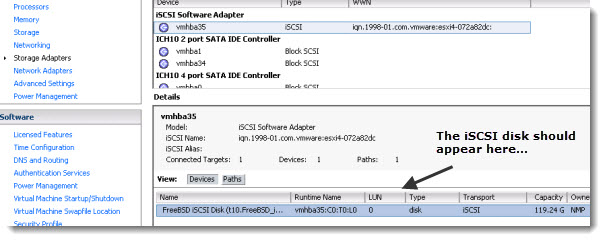
Once validated, you’ll get a prompt to rescan your iSCSI adapters. You can do so. You should be able to see the iSCSI Disk as on the image below.
08. The last step is to create a Datastore through the VMware vSphere Client.
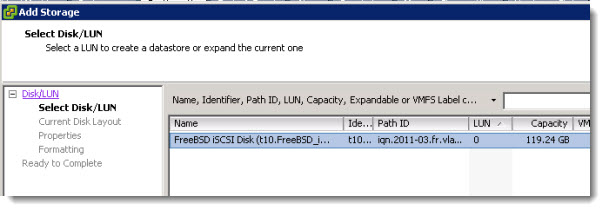
Go to the Storage Menu > Add Storage > Choose Disk/Lun, create a new partition and format the newly created partition with VMSF file system.
You’re done.
You should see the newly created Datastore in the VMware vSphere Client’s user interface.

This article is part of the Home made Do It Yourself NAS series.
Last note: I was able to connect both single disks with “device extent” configuration and being exported as different targets, but I did not manage to Add the
RaidZ volume At the Same time. So I went and shared that volume as an NFS share….
分享到:


相关推荐
how to configure kernelhow to configure kernel
How to Configure User Status in mySAP SRM.pdf
This article introduces how to configure ODBC DSN in Server to access local DB2 for windows in detail. Then I give a sample how to access local DB2 database with ODBC by DB Query Analyzer expediently.
This article introduces how to configure ODBC DSN in Client to access remote DB2 for windows in detail. Then I give a sample how to access remote DB2 database with ODBC by DB Query Analyzer ...
How to Configure NLB MP in mix and native mode
Use Syngress' proven "How to Cheat" methodology to configure and build VMware's ESX Server version 3. This clear, concise guide provides all the information you need to become a virtual whiz! This ...
How to configure OneFS to allow NFS mounts from unprivileged ports
How you configure Iscsi target using starwind free Nas software & configure Iscsi initiator on Oracle Linux 6.4
在Ubuntu18.04中安装NFS服务器以及配置NFS 客户端,详细安装步骤过程,简单实用,一学就会
How to configure an Anybus PROFIBUS Slave module with a Siemens Step7 PLC Below you find an overview of the system configuration that is escribed in this document. In this case the Anybus Slave ...
HOWTO Configure DCOM Timeouts如何配置DCOM的超时设定(13KB)
How to Configure the Universal Worklist (NW2004)[1].pdf
How to Configure Odoo 13 on Pycharm Ubuntu 18 ubuntu18下安装ODOO13 pycharm配置ODOO13开发环境
Chapter 9, Managing Access to the iSCSI and NFS Storage, will show how to configure and manage access to the iSCSI and NFS storage. Chapter 10, Storage IO Control, Storage DRS, and Profile-Driven ...
How to configure your app with iTunes Connect to work with Game Center How to set up leaderboard and achievement systems for use within your app How to add a custom graphical user interface to Game ...
KBA_180523214236_2__PMIC__PMI632_How_to_configure_.pdf
HowTo_Configure_IE
Next, the reader will learn the steps that must be taken to configure their servers and workstations to make the compatible with WSUS. A special section then follows to help readers migrate from ...
How to configure and administer Hadoop and HDFS securely Understanding the internals of Hadoop and how Hadoop can be extended to suit your needs How to use HBase, Hive, Pig, Mahout, and Nutch to get ...
how configure php-fpm 5.x and apache 2.4.x for virtualmin on centos 6