1项目3
1.1项目3设计要求
要求学生改进GeekOS的调度程序,实现基于4级反馈队列的调度算法(初始GeekOS系统仅提供了FIFO进程调度算法),并实现信号量,支持进程间通信。
即完成以下几项:
(1)实现src/geekos/syscall.c文件中的Sys_SetSchedulingPolicy系统调用,它的功能是设置系统采用的何种进程调度策略;
(2)实现src/geekos/syscall.c文件中的Sys_GetTimeOfDay系统调用,它的功能是获取全局变量g_numTicks的值;
(3)实现函数Change_Scheduling_Policy(),具体实现不同调度算法的转换。
(4)实现syscall.c中信号量有关的四个系统调用:sys_createsemaphore( )、sys_P( )、sys_V( )和sys_destroysemaphore( )。
1.2 项目3设计原理和分析
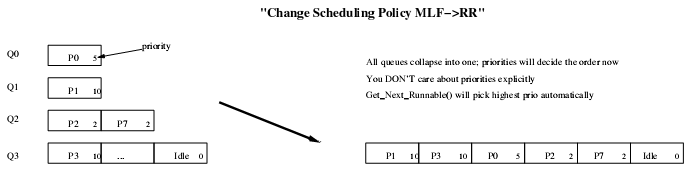
1)Set_Scheduling_Policy(policy,quantum),policy是设置的调度策略,quantum是设置的时间片。例如policy为1说明设置的是多级反馈队列调度算法,g_schedulingPolicy设置为1(g_schedulingPolicy为系统添加的标识算法的变量,初始化为0)。如果policy为0,则说明设置的是轮转调度, g_schedulingPolicy设置为0,把4个队列变成一个队列,即所有的线程都在队列0上了。
2)在系统调用Sys_GetTimeOfDay()中,只需要返回g_numTicks就可以了。在Sys_SetSchedulingPolicy()中,如果state->ebx是1,则设置的是MLF算法,为0则是RR算法。如果state->ebx为其他值,则返回-1。
3)在Init_Thread()中都是把队列放在0队列上的,并且blocked变量为false。
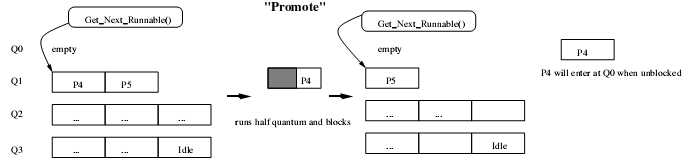
4)在Get_Next_Runnable()中,从最高级的队列开始,调用Find_Best()来找线程优先级最大的线程,直到在某级队列中找到符合条件可以运行的线程。
5)在Wait()函数中,线程被阻塞,所以blocked变量被设置为true,并且如果是MLF算法,则该进程的currentReadyQueue加一,下次运行的时候进入高一级的线程队列。
6)信号量定义
GveekOS定义了信号量的结构体:
structSemaphore{
int semaphoreID; /*信号量的ID*/
char *semaphoreName; /*信号量的名字*/
int value; /*信号量的值*/
int registeredThreadCount; /*注册该信号量的线程数量*/
struct Kernel_Thread*registeredThreads[MAX_REGISTERED_THREADS];
/*注册的线程*/
struct Thread_Queue waitingThreads; /*等待该信号的线程队列*/
DEFINE_LINK(Semaphore_List,Semaphore);/*连接信号链表的域*/
}
7)信号量PV操作
信号量操作:
Semaphore_Create()
Semaphore_Acquire(P操作)
Semaphore_Release(V操作)
Semaphore_Destroy()
Create_Semaphore()函数首先检查请求创建的这个信号量的名字是否存在,如果存在,那么就把这个线程加入到这个信号量所注册的线程链表上;如果不存在,则分配内存给新的信号量,清空它的线程队列,把当前的这个线程加入到它的线程队列中,设置注册线程数量为1,初始化信号量的名字,值和信号量的ID,并把这个信号量添加到信号量链表上,最后返回信号量的ID。
P操作Semaphore_Acquire()中,首先检查传入的信号量ID是否存在,如果存在,接着检查当前线程是否注册使用了这个信号量,如果这两项检查任意一项失败了,那么就返回-1。如果成功了,就把信号量的值减去1,如果减去1后信号量的值小于0,那么就把当前线程放入这个信号量的等待队列上。
V操作Semaphore_Release()中,首先也是检查传入的信号量ID是否存在,如果存在,接着检查当前线程是否注册使用了这个信号量,如果这两项检查任意一项失败了,那么就返回-1。如果成功了,那就把信号量的值加上1,如果加上1后信号量的值小于或等于0,则要把该信号量里等待队列上的一个线程唤醒。
Semaphore_Destroy()中,首先也是检查传入的信号量ID是否存在,如果存在,接着检查当前线程是否注册使用了这个信号量,如果这两项检查任意一项失败了,那么就返回-1。如果成功了,就把该线程从这个信号量的注册的线程数组中删除,并把注册的线程数量减去1。如果这个信号量的注册线程为0了,则把这个信号量从信号量链表中删除,并释放它的内存。
8)多级反馈队列调度队列模型

9)多级反馈队列与分时调度进程队列的转换
1..3项目3实现
实现信号量需要在synch.h文件中添加信号量结构体的定义和信号量队列的的定义
/*
*define Semaphore
*/
struct Semaphore;
DEFINE_LIST(Semaphore_List,Semaphore);
struct Semaphore{
intsemaphoreID;
char*semaphoreName;
intvalue;
intregisteredThreadCount;
#defineMAX_REGISTERED_THREADS 60
structKernel_Thread *registeredThreads[MAX_REGISTERED_THREADS];
structThread_Queue waitingThreads;
DEFINE_LINK(Semaphore_List,Semaphore);
};
IMPLEMENT_LIST(Semaphore_List,Semaphore);
static __inline__ void Enqueue_Semaphore(structSemaphore_List *list, struct Semaphore *sem) {
Add_To_Back_Of_Semaphore_List(list, sem);
}
static __inline__ void Remove_Semaphore(structSemaphore_List *list, struct Semaphore *sem) {
Remove_From_Semaphore_List(list, sem);
}
在syscall.c文件中添加:
static structSemaphore_List s_sphlist;//如果定义为指针类型易导致13号页保护中断
static intsemnub=1;
并完成如下函数:
/*
* Create asemaphore.
* Params:
* state->ebx - user address of name ofsemaphore
* state->ecx - length of semaphore name
* state->edx - initial semaphore count
* Returns: theglobal semaphore id
*/
static int Sys_CreateSemaphore(struct Interrupt_State*state)
{
// TODO("CreateSemaphoresystem call");
int rc;
char*name = 0;
//intexit, id_sem;
structSemaphore *s=s_sphlist.head;
if ((rc =Copy_User_String(state->ebx, state->ecx, VFS_MAX_PATH_LEN, &name)) !=0 )
goto fail;
//Print("Copy_User_String_Name=%s\n",name);
while(s!=0)
{
//Print("whiles->semaphoreName=%s\n",s->semaphoreName);
if(strcmp(s->semaphoreName,name)==0)
{
s->registeredThreads[s->registeredThreadCount]=g_currentThread;
s->registeredThreadCount+=1;
returns->semaphoreID;
}
s=Get_Next_In_Semaphore_List(s);
}
s=(structSemaphore *)Malloc(sizeof(struct Semaphore));
s->registeredThreads[0]=g_currentThread;
s->registeredThreadCount=1;
//strcpy(s->semaphoreName,name);
s->semaphoreName=name;
//Print("s->semaphoreName=name===%s\n",s->semaphoreName);
Clear_Thread_Queue(&s->waitingThreads);
s->value=state->edx;
s->semaphoreID=semnub;
semnub++;
Add_To_Back_Of_Semaphore_List(&s_sphlist,s);
returns->semaphoreID;
fail:
Print("CreateSemaphorefailed!");
return -1;
}
/*
* Acquire asemaphore.
* Assume thatthe process has permission to access the semaphore,
* the call willblock until the semaphore count is >= 0.
* Params:
* state->ebx - the semaphore id
*
* Returns: 0 ifsuccessful, error code (< 0) if unsuccessful
*/
static int Sys_P(struct Interrupt_State* state)
{
//TODO("P (semaphore acquire) system call");
structSemaphore *s=s_sphlist.head;
while(s!=0)
{
if(s->semaphoreID== state->ebx)
break;
s=Get_Next_In_Semaphore_List(s);
}
if(s==0)
return-1;
s->value-=1;
if(s->value<0)
Wait(&s->waitingThreads);
return 0;
}
/*
* Release asemaphore.
* Params:
* state->ebx - the semaphore id
*
* Returns: 0 ifsuccessful, error code (< 0) if unsuccessful
*/
static int Sys_V(struct Interrupt_State* state)
{
//TODO("V (semaphore release) system call");
structKernel_Thread *kthread;
structSemaphore *s=s_sphlist.head;
while(s!=0)
{
if(s->semaphoreID==state->ebx)
break;
s=Get_Next_In_Semaphore_List(s);
}
if(s==0)
return-1;
s->value+=1;
if(s->value>=0){
kthread =s->waitingThreads.head;
if(kthread !=0){
Wake_Up_One(&s->waitingThreads);
}
}
return 0;
}
/*
* Destroy asemaphore.
* Params:
* state->ebx - the semaphore id
*
* Returns: 0 ifsuccessful, error code (< 0) if unsuccessful
*/
static int Sys_DestroySemaphore(structInterrupt_State* state)
{
//TODO("DestroySemaphore system call");
structSemaphore *s = s_sphlist.head;
while (s) {
if(s->semaphoreID == state->ebx)
break;
s =Get_Next_In_Semaphore_List(s);
}
if (s == 0)
return-1;
s->registeredThreadCount--;
if(s->registeredThreadCount == 0) {
Free(s);
Remove_From_Semaphore_List(&s_sphlist,s);
}
return 0;
}
实现多队列的优先级调度要在kthread.h中定义调度方式的宏:
#define ROUND_ROBIN 0
#define MULTILEVEL_FEEDBACK 1
/* * Number ofscheduling policy. * 0 -> RoundRobin * 1 -> Multilevel feedback */
int g_schedulingPolicy;
在kthread.c中完成如下函数:
/*
* Get the nextrunnable thread from the run queue.
* This is thescheduler.
*/
struct Kernel_Thread* Get_Next_Runnable(void)
{
structKernel_Thread* best = 0;
int i,best_index_queue = -1;
if(g_schedulingPolicy == ROUND_ROBIN) {
structKernel_Thread* best_in_queue = NULL;
for (i =0; i < MAX_QUEUE_LEVEL; i++){
best_in_queue= Find_Best(&s_runQueue[i]);
if(best == NULL) {
best= best_in_queue;
best_index_queue= i;
}else if (best_in_queue != NULL){
if(best_in_queue->priority > best->priority) {
best= best_in_queue;
best_index_queue= i;
}
}
}
} else if(g_schedulingPolicy == MULTILEVEL_FEEDBACK) {
if (g_currentThread->priority != PRIORITY_IDLE ){
if (g_currentThread->blocked && g_currentThread->currentReadyQueue> 0 )
g_currentThread->currentReadyQueue--;
}
for (i =0; i < MAX_QUEUE_LEVEL; i++){
best= Find_Best(&s_runQueue[i]);
best_index_queue= i;
if(best != NULL)
break;
}
if (best->currentReadyQueue < MAX_QUEUE_LEVEL-1 )
best->currentReadyQueue++;
}
KASSERT(best!= NULL);
Remove_Thread(&s_runQueue[best_index_queue],best);
return best;
}
在syscall.c中完成如下函数:
/*
* Set the scheduling policy.
* Params:
*state->ebx - policy,
*state->ecx - number of ticks in quantum
* Returns: 0 if successful, -1otherwise
*/
static int Sys_SetSchedulingPolicy(struct Interrupt_State* state)
{
if (state->ebx != ROUND_ROBIN&& state->ebx != MULTILEVEL_FEEDBACK)
return -1;
g_schedulingPolicy =state->ebx;
g_Quantum = state->ecx;
return 0;
}
信号量测试结果如下图所示:
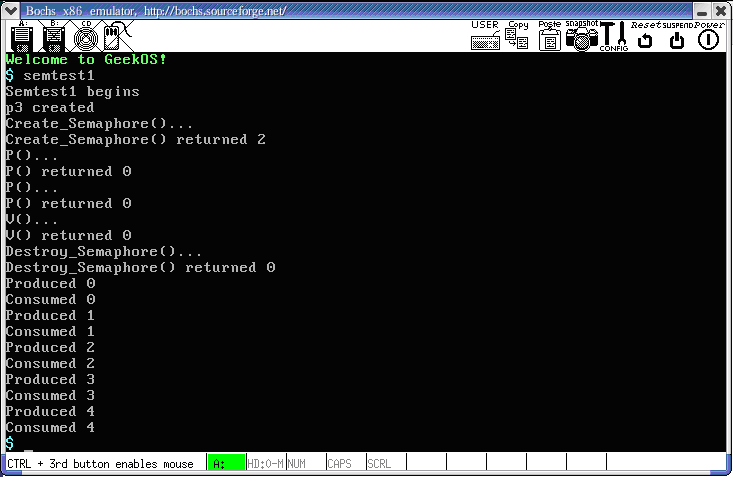
图1 项目3信号量测试界面
多队列优先级调度测试结果如下图所示:
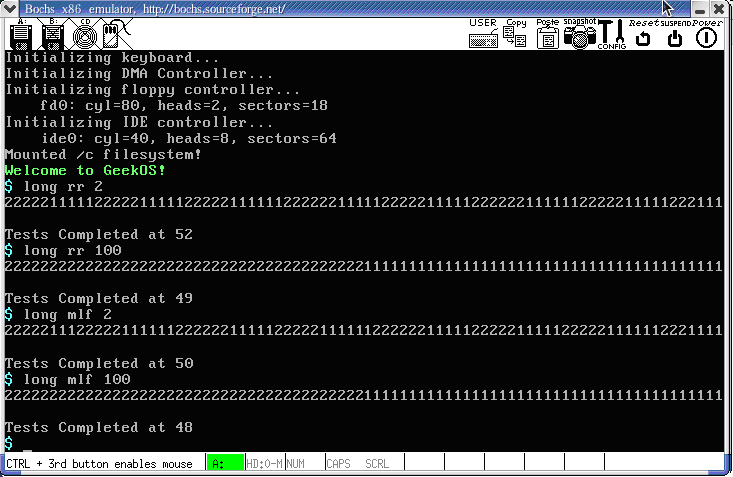
图2 项目3多队列优先级调度测试界面
1.4项目小结
从上面的测试结果来看,这两种调度算法都是基于时间片轮转,输出2和输出1的的数量基本一样多(多队列优先级调度算法的时间片都是一样的)。进程的周转时间还包括进程切换的时间。同样的调度算法,同样的时间片,程序执行的周转时间可能不一样(进程切换花费的时间可能不一样)。信号量测试程序测试的是生产者消费者的互斥操作,生产一个消费一个。
分享到:


相关推荐
GeekOS project3,GeekOS project3,GeekOS project3,GeekOS project3,GeekOS project3 还没实现全部功能
桂电17级学生完全实现,geekos project3,可直接bochs运行
Geekos Project3 代码,已实现。linux下直接bochs运行即可。
GeekOS project2,GeekOS project2,GeekOS project2,已经实现,其功能
GeekOS project0 源码,GeekOS project0 源码,GeekOS project0 源码,GeekOS project0 源码,GeekOS project0 源码,已经实现
Geekos project0完整实现代码
操作系统课程设计,GeekOS-project3完全实现,可直接运行。
Geekos project1完全实现 里面包括了所有的功能和教程,保证完全没有问题
操作系统 课程设计 geekos project2 愿大家能顺利通过 里面有简单使用描述
Geekos project1完整实现代码
geekos project2(完全实现)
GeekOS操作系统实验报告.doc,GeekOS操作系统实验报告.doc,GeekOS操作系统实验报告.doc,GeekOS操作系统实验报告.doc
GeekOS Project2完整文件,代码已经写好,bochs文件也已配置完毕。解压到系统后,进入文件的build目录运行。
geekos project1
GEEKOS是一个免费的操作系统内核,运行于X86 CPU上,代码约5000行,适合做教学用操作系统。
GeekOS project0 完全实现(附网页版步骤)
Geekos project4 (已实现) linux下直接bochs运行即可。。。。。。。。
桂电17级学生geekos project4完全实现,可以直接bochs运行
GeekOS project1 完全实现(附网页版步骤)